About Me

Showing posts with label Home made. Show all posts

Friday, May 11, 2012

How I really work

In the past, I have read blog posts that expose a person in their true form.  They always awe me as I'm the person who tries to do a quick tidy behind the child before I shoot the picture.  Of course, half the time I miss the shot.  Then there is another good percentage of the time that I would not even think about taking a picture no matter how cute my kid is being because there is just no way I could make the background look presentable in any amount of short time!  

On Wednesday morning, I walked around my house, and took note that nearly every single room was destroyed.  Many spaces just had their typical stuff scattered around.  I only make the kids tidy their rooms for vacuuming once a week on Friday's.  So, it's safe to say, their rooms are messy.   Naturally, my canning from Monday is all sitting on the counter still in all its red bejeweled glory. The hallway looked as if a book tornado make a few passes. (the little kids like to read books by pulling off the entire shelf, sitting in the pile, and then reading.) It also was the home of the spilt box of costumes. The front room had the remnants of a pillow fort and the toys that they were playing with inside of said fort. The dining room had the leftovers of a get well soon card that the family made together for my sis who just had surgery, and the toys that were brought in to keep Zander happy on the floor and not crawling over the masterpiece in the making.   The kids bathroom was host to a family reunion for the toothbrushes thanks to Abigail.  She set out beds for each one, and made sure they had snacks.  Toothpaste, of course.  Darling in its own disastrous way.   Am I painting a picture yet?

My problem is I don't know where to start.  I wanted to put away my jams and syrups so I could prepare the kitchen for Strawberry 2.0, but this is what I ran into when I went up the stairs to get to the food storage closet.  

 These are some of our costumes.  Let me explain.  I love all things pretend.  I love to sew and buy costumes.  In our last home, Khali had a gigantic closet and we hung up all of our costumes in there.  When we moved, there was no extra closet space to put them.  Since I didn't have a solution for this, I left the costumes packed in a box, stored in the back of food storage closet knowing that without a good place for them, they'd constantly be a mess.  However, I now have a 6 year old who is extremely curious and can ready very well.  So, of course when I asked her to retrieve some salsa one night, she stepped on top of this box to get it and read 'Costumes' written in fat sharpie.  My salsa never was brought to the kitchen, and when I went upstairs to see where my child had gotten lost, the costumes were being strewn about as Bell looked, excitedly, for a princess gown.  I had successfully avoided the problem of costume storage for 8 months.  That was 4 months ago.  Since then, whenever the kids wanted to play dress up, they dug through the box casting off the rejections in all directions.  Then someone (generally me) would go toss them all back into the box for the process to repeat another day.

So, with an entire house to put back in order, I went to the garage. I had seen a costume wardrobe on Ana White's website.  I figured if I fixed my costume problem, then I would be able to traverse the path from my kitchen to the storage area, and then, and only then, could I clean up the rest of my house.  This logic works for you,  doesn't it?  If it does, please come help me explain to my dearest.  He doesn't get it at all.

I didn't have any nice wood to work with, and my dearest darling has banned me from spending any more at Lowes or Home Depot this month, so I went with plywood leftover from my Chicken Coop project.  While not being ideal wood, this helps me solve the problem of what to do to with these piles that are taking over my garage.  (The wood on the left is slated for Potato Boxes. My next project!)

 The next problem comes from not having a table saw to rip down the boards, or a chop saw to make quick cuts.   I did have my trusty old Jig Saw.  Thanks Daddy for giving me your cast off tools!  I obviously was slightly determined or the lack of the ideal wood and tools would have sent me to choose a different starting point in cleaning the house. Maybe the costumes?  Nah.

I had the base built in about 2 hours in the afternoon, and even had enough time to make a proper dinner!  Because this was turning into a use-it-up project, I went to the paint closet and made my selection from there.  I went with 'Twig Basket', since I wanted a neutral color to work for all my littles.   I managed to paint it while the older kids cleaned up the dinner dishes.  After bedtime, I pulled out my Silhouette and cut out the freezer paper stencil I used on the base to jazz it up a little.

I didn't wait quite long enough to stencil,  I got a bit of paint (a whole lot of paint) on the sole of my iron.  But this isn't the first time a craft project has made a mess of my iron. A little salt will clean it up!  
I ran to the store this morning to buy castors to put on the bottom so that we could move it easily.  This addition puts the project at a grand total of $7.00 out of pocket.   I had it upstairs with a few costumes already hung up when the little girls woke up to surprise them.  


Ideally I'd finish up the project with 
  • Baskets on the top shelf  to hold wings, crowns, hats and armor.
  • Full body mirror on one side
  • Hooks for bags on the other side
  • Sword Storage
  • Organize Shoes that are now tossed into the bottom.
Not too shabby for a day project eh?  

Wednesday, January 18, 2012

Homemade Bagel Chips


When you make the Original Chex Mix, do you buy bagel chips to put in? Or, are you like me and refuse to pay $5.00 for a 7oz bag?  Sadly, bagel chips have always been one of my favorite ingredients in the mix!  So, this fall, when I started making Chex Mix recipes, I thought to myself, "I make croutons at home.  Why not Bagel Chips?"   Well, guess what.  I tried it.  It's super easy and cheap to boot.  Score!
  • First, you slice your bagels.  For future reference, I'm using 3 bagels in this batch.
Depending on what I want the chips for, I slice them differently.  For any snack mix, I prefer the coins.

For soup or salad, I go with the faster method of plank slices.  Why?  Because, I'm lazy like that.  

  • Second, combine 2 Tablespoons melted butter or olive oil with your choice of seasonings mixed in.  I'm a garlic lover, so I added 3 large garlic cloves, minced.   You could do onion and garlic, parmesan and garlic, herb and garlic (Told you, I love garlic.)  Then placing all your bagel pieces in a large plastic bag, pour in the melted butter/olive oil and shake.  This will help with equal distribution.


  • Third, Empty contents of your bag onto a cookie sheet, spreading them out evenly.  Pop into a hot oven at 325 for 15-20 minutes until they are turning brown.  (YMMV, so watch carefully!)


  • Fourth,  Enjoy!  Once they are cooled you can put them in a container for storage for the week, or use them immediately in your soup.  


Thursday, September 22, 2011

Autumn Beef Stew

   Tonight I made a delicious stew.  Partially because the weather has started to turn cooler and partially because when I got home from a very long day at 5:30, I needed to figure out something to make for dinner; and many of these ingredients were already in my fridge.  Isn't that one of the best things about soups and stews?  They allow you to dump things in a pot and still taste fabulous?  

   When I started this stew, the tomato flavor was overbearing.  It was at that point that I added in the leftover roasted acorn squash that was sitting in the fridge from earlier this week.  It was just the flavor that was needed.  This was going to be just a one off dish of whatever I could put together out of the fridge in a hurry, but the kids all asked if I would make it again, so I thought I better write it down!

  
   Enjoy!

Autumn Beef Stew

Ingredients

  • 3 tablespoons margarine
  • 1 small white/yellow onion, chopped
  • 1 small red onion
  • 4 carrots, sliced
  • 3 stalks celery, sliced
  • 1 clove garlic, minced
  • 1/2 cup all-purpose flour
  • 4 cups water
  • 1 potato, chopped
  • 1 sweet potato, chopped
  • 2 pounds cubed leftover beef roast
  • 2 bay leaves
  • 1 teaspoon salt
  • 1/2 teaspoon ground black pepper
  • 1/2 teaspoon nutmeg
  • 1/8 teaspoon ground cloves
  • 1 teaspoon Worcestershire sauce
  • 1 teaspoon Soy sauce
  • 1 bottle tomatoes
  • 1 acorn squash, mashed


Directions

  1. Melt butter in a skillet, and saute onions, carrots, celery and garlic until they are tender.
  2. Sprinkle Flour over veggies and stir well.  Let brown for 1-2 minutes.
  3. Pour water into pot and bring to boil.
  4. Add Potatoes and Sweet Potatoes, then let cook for a few minutes.
  5. Add Tomatoes , Roast, Acorn Squash and seasonings.
  6. Bring to a simmer, and cook over medium-low heat till flavors meld.
  7. Serve hot with Crusty Bread!

Wednesday, September 21, 2011

A Little Sweetness

I am the proud new owner of a Victorio Food Strainer/ Sauce Maker.   Let me tell you.  It Rocks.
Weeks ago I spent many an hour cruising the net trying to figure out what tool would be the best choice for working with blackberries.  I have frozen my entire harvest the past two years, but this year I really wanted to make some Jams and Syrups.  I made my first batch of Blackberry Jam over a month ago, and while it all got devoured in the first two weeks, the seed content was undesirable.  Honestly, it was just plain annoying.  The seeds made the jam very chewy and got stuck in your gums all the time!
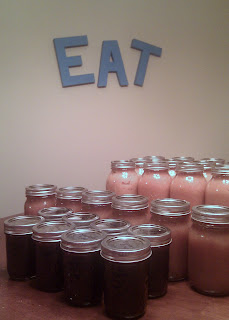
Unfortunately, I waited too long in the season to make the decision to buy the Victorio, and I only had one bucket of blackberries left.  I took my bucket of blackberries, washed them a bit, then dumped them in a large stock pot with about half a cup of water.  I boiled them for a few minutes, till the point where they started to soften, then poured them into the strainer's hopper.  It took only a few minutes to process the seeds from juice and pulp!   (I tried to reprocess the seeds/skins but would not recommend this for blackberries.  There was not enough fruit left to separate and I ended up jamming the tool with solid seeds.)  I then poured the juice and fruit pulp back into the stock pot to boil with some sugar and some lemon zest till it started to thicken and then poured it into small jars.  Thankfully we had a little too much for 8 jars, and I had to use some up, right away.  This syrup is amazing on ice-cream and looks beautiful to boot!  I can't wait to try it on waffles!  I am sad I don't have any more blackberries to work with as I'd love to make a batch of syrup with a bit of Almond flavoring added...  Just the thought makes my mouth water.

Along with the syrup, I was able to can a few apple sauce variations.  I cut apples in half and roasted multiple huge pans in the oven, then used the Victorio to mash all of the ingredients together.  While this took a very long time to make so much applesauce, it was really light work.  Both Khali and Porter loved to crank the handle and smoosh the fruit down the hopper.  I was able to reprocess the discarded skins and seeds a second time on the apples to reclaim more sauce.  I was amazed how dry the seeds and skins where when we were done.  I felt there was very little fruit wasted.

  • I combined some with Pears and a little bit of vanilla and nutmeg for an Apple-Pear sauce.
  • I mixed some with Poached Peaches and Ginger for Apple-Peach sauce.
  • I also left a few jars straight Roasted Apple sauce, which is delicious on its own.

At this point, I ran out of large quart bottles, and only had pint, and jelly jars left on hand.  With no desire to run to the store to pick up another case, I was inspired to cook down the rest of the apples further to make a delicious Apple Butter.  I followed the recipe found here http://simplyrecipes.com/recipes/apple_butter/.  I snuck a bit before canning it and think its a definite keeper.
Amazingly, after canning for four days straight, the only wound I received was a burn from that darn apple butter.  Watch out when you're cooking it down, you're working with such a thick sauce the air bubbles pop pretty high!  
There is a beauty involved with canning.  I am enjoying looking at all of the bottles filled with beautiful food.  Part of me just wants to keep canning and putting food away.  It is the same part of me that sheds a tear whenever I drive past a blackberry bush that is now succumbing to fall.   But at the same time, I am very excited to be putting away the canning supplies tomorrow and reclaiming the kitchen and dining rooms.  Now if only I could figure out where to put all this food!


Monday, June 7, 2010

Calorimetry Crochet A.K.A. Thick Headband


Over the weekend I saw a few of these adorable headbands that were selling for 10-15 dollars each! Of course my frugal nature sent me searching for general instructions so that I could whip up my own and use up some of my yarn stash. After all, if you don't spend money on finished products, you can spend that money buying new notions, right? Well, once you clear our your old stash to make room of course. For this project I was using some left-over Alpaca/Lambswool blend that I had hand-died. This project really does not require much yarn, so check your stash and see what small yarn cakes you have tucked away.


I searched around for awhile and found an Etsy store which sells patterns with wonderful reviews. I normally do not buy patterns, because for small projects there are generally plenty of ideas shared for free on the net, and I feel I am competent enough to figure things out on my own through trial and error. I worked through the pattern in about 2 hours. While it was well written, and rather easy to understand, the thought behind the pattern really lacked. The bottom calorimetry (made from the pattern purchased on Etsy) lays flat, and because of the way the pattern increases and decreases the edges are rough.
So, the next morning, I started working up a different pattern to see if I could get better results and I am much happier. Can you see the top calorimetry has some shape to it? It is slightly concaved. This stretches and fits to the head well. The size difference was a concious choice. I made it a bit smaller to fit both Abi and Issy, where the bottom wrap would fit a large toddler up to an adult. The best part of buying the pattern was the cute flower that came with it. I trimmed it out in white to make it stand out and then attached it to an alligator clip so that it can be worn separately. I tried to model it on Abigail as well, and while it fits, she wouldn't leave it on her head long enough for me to snap the picture. I don't know where she gets that stubborn nature, I really don't.

Tuesday, May 18, 2010

Covered Diaper Wipe Case

I finally finished my Diaper Wipe Case! There are a few zillion tutorials online that I read through and loosely followed. These cute cases often retail for $20+ in baby boutiques so of course I had to make my own. I bought 1 fat quarter which is probably enough material to cover two cases. I had felt on hand, the trim, and all the buttons. I covered the case in a morning while listening to a movie with the kids and baking something. It didn't take long, just a ton of glue sticks! Tonight I found the buttons that I think finished the look perfectly and glued them on. Viola! Finished feels so good!
$1.00 for the Fat Quarter Material
$1.25 for the Huggies Diaper Wipe Case
$0.10 for 5 glue sticks
So my grand total for this adorable little project comes to; $2.35
I can handle that :)

Thursday, March 12, 2009

Up-cycled Ribbon Edge Lovey

Bell and I had fun today up-cycling an old dress of mine into a Ribbon Edged Lovey for Abby! I also had a nice stock pile of ribbons that I bought when making hairbows for the older girls so this project was made completely from things we already had. Bell had a lot of fun helping cut each of the ribbons, and then handing them to me while I was sewing. I roughly followed the instructions found on this blog. I did not applique anything but I did add a thin batting. This does make the lovey less likely to be carried nicely in my purse, but with all hard wood floors, everything is nicer with a little cushion. Now only to wait a few months for her to be interested in it!
This lovey is a bit smaller than I had wanted, some darling little one was helping out a bit too much when I was cutting this material. I plan to next make a quilted top and back it with fleece with no batting. I am going to try 24" with ribbon tags only at the corners... I think it will be a little more useful that way.

LinkWithin

Related Posts with Thumbnails